This tutorial is a step by step explanation of how to setup Jagged Alliance: Deadly Games to play on modern PC’s and for setting it up to play multiplayer games via the internet. This has been impossible until the recent release of DosBox version 0.63, which adds the ability to use a tunnelling IPX network server/client via TCP/IP internet connections.
Initial Setup
Install Jagged Alliance – Deadly Games, and make note of the path to the install directory.
Install DosBox. You will need at least version 0.63 as previous versions did not support the IPX multiplayer setup options.
Install D-Fend (v2 or later), a GUI for DosBox . This tutorial makes heavy use of the windows version of D-Fend.
Setting up a D-Fend Profile
Run D-Fend. From the profile menu, choose the add profile wizard.

Give the profile a name. Leave the checkboxes unchecked.
In the Game EXE field enter the location of the Deadly Games executable (DG.EXE).
In the Setup EXE field enter the location of the Deadly Games sound setup executable (SETSOUND.EXE)

On the next screen, Cycles and Video card, just choose the defaults. You can always edit these values later in D-Fend.
Click Auto Configure on the next screen to configure the mounts automatically.
On the following screen, configure the Soundblaster. I had no success using the Soundblaster16 (sb16) option here, so I’ve chosen the SoundblasterPro (sbpro1) option, which works fine. Leave the remaining fields as default shown here.
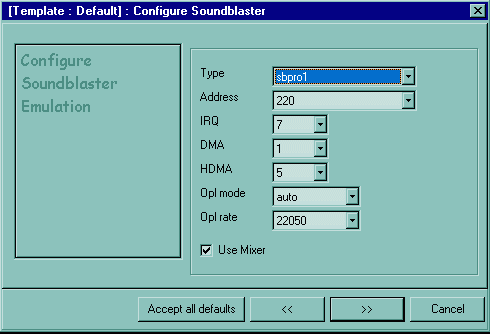
On the following screen uncheck the Enable GUS checkbox. We won’t be needing this soundcard emulation.
Ensure both boxes are checked on the configure MIDI screen, and that the device drop down is set to default. This will use your default windows midi player for the in-game music. It should be better sounding music than any of the old soundcard options available in DOS games.
On the Configure PC screen, disable the Disney Sounds Source box, but leave the PC speaker enabled. Apparently some DOS games won’t run with the PC speaker disabled, so leave this checked.
Leave the Memory Requirements at the default settings. You can play around with these later if you like.
Click Finish to store your profile. You should see your game profile in the D-Fend window. You could double click on this to play the game, but we should take care of a few more things first.
Setting up the Sound
In order to have the sound work properly, we have to set up the soundcard hardware using the DOS setup, SETSOUND.EXE. This will allow us to choose a sound card that DosBox will emulate.
From the D-Fend run menu, click on Run Setup
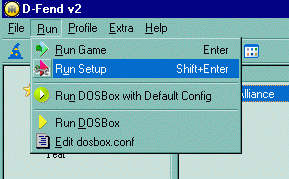
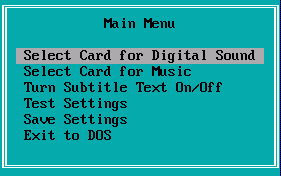
This will launch the DOS soundcard setup. Once you reach the menu screen highlight the Digital Sound option and press enter
Choose the Sound Blaster Pro option
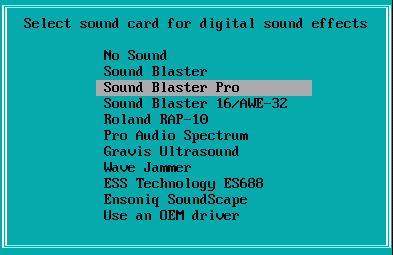
Select “No” for the Auto-Detect card option. Then choose 220 for the port setting, 7 for the IRQ setting, and 1 for the DMA channel. You will recall these were the default options we chose when setting up our D-Fend profile using the profile wizard. This matches up the DOS hardware selection to the DosBox soundcard emulation.
Returning to the main menu, Select Card for Music
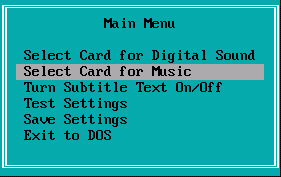
Choose the Roland MPU401/General Midi option. This matches up with our choice for using midi within the D-Fend profile setup.
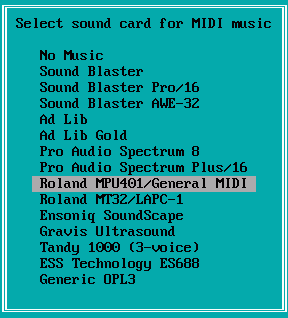
Again say no the the soundcard Auto-Detect. For the Port setting I chose 388, just so I would have no conflict with the port used by the Soundblaster. I’m not sure if it matters, as there is no setting for this in the D-Fend profile.
Once back at the main menu, choose Save Settings, and then Exit to DOS. This will take you back to D-Fend.
Playing the Game
You can double-click on the profile in D-Fend to play the game now. By default the sound options are turned off in Deadly Games, so once you are in the game, click on the Options tab, where you can independantly activate the sound and music, as well as control their volumes.
While in the game, you can press ALT+ENTER to switch between windowed and full screen modes. CTRL+F10 will lock and unlock the mouse within the DosBox window. CTRL+F11 and CTRL+F12 change the speed of the DosBox emulation, which can speed up the game somewhat. It can get unstable at very high speeds, but I had no problems on my computer at 6000-7000 cycles. You can read the emulation speed at the top of the DosBox window.
Multiplayer Setup
Now for the best part, playing Jagged Alliance-Deadly Games via the internet! Version 0.63 of DosBox lets you play multiplayer games using the IPX protocol via the internet (TCP/IP) using a tunnelling IPX server/client system.
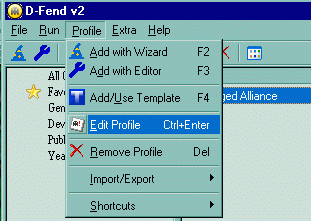
In order to do this, you must make some changes in your D-Fend profile for Deadly Games. Highlight your profile, then from the Profile menu, choose Edit Profile.
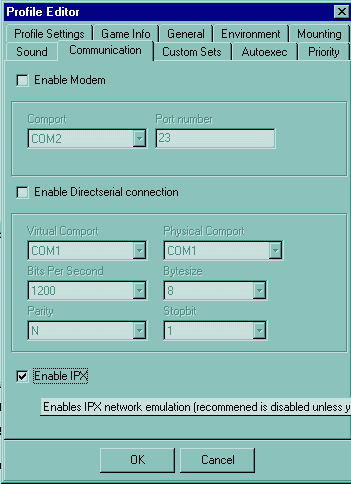
In the profile box, you can see many of the options that were set during the profile wizard setup. Click on the Communication tab, and check the IPX box. This enables the IPX multiplayer option.
Now you have two choices: to be the host (server) or a client.
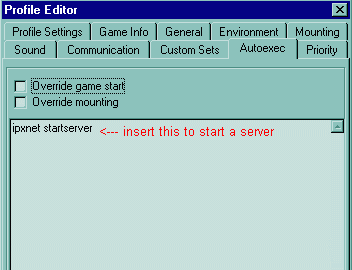
Click on the Autoexec tab.
To set up a server, type IPXNET STARTSERVER in the text box. Click OK. Now the next time you start the game, it will start an IPX server, using your internet connection IP address as the server address. Then it will run the game. Within the game, you can click on Multiplayer, then Network Game, and Lead a Network Game. Set your various game options. You won’t be able to start the game until at least one player has joined, and chosen a colour.
To join a server as a client, type IPXNET CONNECT xxx.xxx.xxx.xxx in the text box. The xxx indicate the IP address of the host. You will have to communicate with the host in advance to get the IP address. Click OK. The next time you start the game, it will connect to the IPX host located at the IP address you have entered. The game will start, where you can choose Multiplayer, then Network Game, then Join a Network Game. Once it finds the server, you will be able to click on the server name and join. Choose a color for your team, and you will enter the game lobby.

You might want to have separate profiles for server and client. You can use the Export Profile option in the File menu to save a profile then import it again and give it a new name right away. Then use this new profile to change the Autoexec options.
I hope this tutorial can be of some use. Thanks to the DosBox and D-Fend creators for their great work.
That’s it, you’re ready to play!