Complete listing of Ghost Recon, Desert Seige, and Island Thunder weapons
First, locate the file no_restrictions.kil in your Ghost Recon directory. It should be located in the ..\Ghost Recon\Mods\Origmiss\Kits folder.
Make a copy of this file and save it somewhere safe, but not in your Ghost Recon directory. This is the file that we will be adjusting to allow us to choose our own kits for our AI teams. If you run into trouble, or would like to restore the original kits, you can just move the copied file back into this directory. We could also alter any of the other .kil files (no_explosives.kil, no_sensors.kil, etc.) in this directory to allow default kits for these play modes, but the no_restrictions option suits our purposes here.
Once you have saved the backup file, open the original no_restrictions.kil file in a text editor. It should look like the listing in below. The file is layed out similar to an HTML file. Between each <Actor>….</Actor> qualifier is the list of kits available to that particular actor (soldier). Take a look at the line: <Actor Name=”mp_plt1_asl.atr”> indicated as #1, where mp = multiplayer, plt1 = platoon (team) #1, asl = assault (rifleman):
<KitRestriction Name=”No Restrictions”>
<Actor Name=”mp_plt1_asl.atr”> #1
<Kit Name=”rifleman-01.kit”/>
<Kit Name=”rifleman-02.kit”/>
<Kit Name=”rifleman-03.kit”/>
<Kit Name=”rifleman-04.kit”/>
<Kit Name=”henry_ramirez-01.kit”/>
<Kit Name=”henry_ramirez-02.kit”/>
<Kit Name=”henry_ramirez-03.kit”/>
<Kit Name=”henry_ramirez-04.kit”/>
<Kit Name=”lindy_cohen-01.kit”/>
<Kit Name=”lindy_cohen-02.kit”/>
<Kit Name=”lindy_cohen-03.kit”/>
<Kit Name=”lindy_cohen-04.kit”/>
</Actor>
<Actor Name=”mp_plt1_dem.atr”>#2
<Kit Name=”demolitions-02.kit”/>
<Kit Name=”demolitions-01.kit”/>………etc.
In multiplayer games, there are four separate teams (platoons), each of which can have nine soldiers. In the case of our AI teams, each human player would be in control of one team. By making changes to this <Actor> we can effect the default weapons kit that all riflemen in team (or platoon) #1 will have. When playing multiplayer with AI backup, the computer will assign you 3 riflemen, 3 demolitions, and 3 support. By changing the rifleman kit (mp_plt1_asl.atr), we change the kit for all 3 riflemen in team #1. You may have noticed that the computer doesn’t equip you with a sniper. Have no fear! You do get to choose one soldier before you start a multiplayer game, so you can choose a sniper at that point.
A little further in no_restrictions.kil we see (#2): <Actor Name=”mp_plt1_dem.atr”> which is the beginning of the kit descriptions for our demolitions expert from team #1. Take some time to look through no_restrictions.kiland familiarize yourself with the layout.
As you move further into no_restrictions.kil, you will see the remaining <Actor>’s for team #1, followed by the <Actor>’s for the remaining three teams. By changing each of these individually, we can create different default kits for each member of the four teams. Next we will begin making the changes.
<Actor Name=”mp_plt1_asl.atr”> is the rifleman for platoon or team #1
<Actor Name=”mp_plt2_asl.atr”> rifleman for platoon/team #2
<Actor Name=”mp_plt3_asl.atr”> rifleman for platoon/team #3
<Actor Name=”mp_plt4_asl.atr”> rifleman for platoon/team #4
<Actor Name=”mp_plt1_dem.atr”> demolitions for platoon/team #1
<Actor Name=”mp_plt2_dem.atr”> demolitions for platoon/team #2
<Actor Name=”mp_plt3_dem.atr”> demolitions for platoon/team #3
<Actor Name=”mp_plt4_dem.atr”> demolitions for platoon/team #4
<Actor Name=”mp_plt1_hvywep.atr”> support for platoon/team #1
<Actor Name=”mp_plt2_hvywep.atr”> support for platoon/team #2
<Actor Name=”mp_plt3_hvywep.atr”> support for platoon/team #3
<Actor Name=”mp_plt4_hvywep.atr”> support for platoon/team #4
<Actor Name=”mp_plt1_snip.atr”> sniper for platoon/ team #1
<Actor Name=”mp_plt2_snip.atr”> sniper for platoon/ team #2
<Actor Name=”mp_plt3_snip.atr”> sniper for platoon/ team #3
<Actor Name=”mp_plt4_snip.atr”> sniper for platoon/ team #4
Now we need to determine which kits we like and want to add as our default kit. Click here to look at all of the weapons kits for each soldier type. Note that this table also includes all of the weapons for the Desert Seige and Island Thunder add-on packs. If you added these mods in the accepted order (first DS then IT), the list should match up to the kits available to you in the Player Setup area of the game. If you don’t have these add-ons, just ignore those sections of the tables.
You may also see the statistics of the available weapons.
You will see something similar to this on the weapons selection page:
This will be the kit of choice for our example. We would like to replace the default kit for our riflemen with the MP5-SD rifle and Claymore mines, which is kit #5 from the weapons selection page. The text below the kit, <Kit Name = “henry_ramirez-01.kit”/>, is what we have to add to no_restrictions.kil to change our default kit. You can highlight the text with your mouse and copy it, or type it manually into the .kil file. <Kit Name=”henry_ramirez-01.kit”/>
Going back to no_restrictions.kil, add the copied text <Kit Name=”henry_ramirez-01.kit”/> as the first item in the rifleman <Actor> for team #1, shown below. It is important that this is added as the first item, as the first item for each <Actor> is what the computer uses as the default weapons kit.
<KitRestriction Name=”No Restrictions”>
<Actor Name=”mp_plt1_asl.atr”>
<Kit Name=”henry_ramirez-01.kit”/>__this has been added
<Kit Name=”rifleman-01.kit”/>
<Kit Name=”rifleman-02.kit”/>
<Kit Name=”rifleman-03.kit”/>
<Kit Name=”rifleman-04.kit”/>
<Kit Name=”henry_ramirez-01.kit”/>
<Kit Name=”henry_ramirez-02.kit”/>
<Kit Name=”henry_ramirez-03.kit”/>
<Kit Name=”henry_ramirez-04.kit”/>
<Kit Name=”lindy_cohen-01.kit”/>
<Kit Name=”lindy_cohen-02.kit”/>
<Kit Name=”lindy_cohen-03.kit”/>
<Kit Name=”lindy_cohen-04.kit”/>
</Actor>
<Actor Name=”mp_plt1_dem.atr”>
<Kit Name=”demolitions-02.kit”/>
<Kit Name=”demolitions-01.kit”/>……etc.
That’s all there is to it! Now you can use the weapons table to select the kits you would like for your demolitions, support, and sniper and add these to the appropriate actors:
<Actor Name=”mp_plt1_dem.atr”> demolitions for team #1
<Actor Name=”mp_plt1_hvywep.atr”> support for team #1
<Actor Name=”mp_plt1_snip.atr”> sniper for team #1
This will complete the new kits for team #1. You can change the other teams (plt2, plt3, plt4) now if you wish, but it is not required for our testing.
Save no_restrictions.kil, overwriting the original.
You can now run Ghost Recon and select your newly equipped team.
Be sure that both the server and players using the new kits have put a copy of the adjusted no_restrictions.kil file into their ..\Ghost Recon\Mods\Origmiss\Kits folder, or they won’t be able to utilize the new teams.
In order to take advantage of the changes we are making, we will have to select several options from the Multiplayer Server Setup screen when setting up our game (only the player hosting the game has to do this).
On the Gameplay tab, choose No Restrictions for our Available Kits, and check the AI Backup option. If the AI backup option isn’t available, you will have to turn off respawning in the respawn tab of the server setup.
IMPORTANT: Also be sure to set the Available Teams colors as shown (Team #1 Blue, #2 Red, #3 Green, #4 Gold), otherwise you will not get the proper kits.

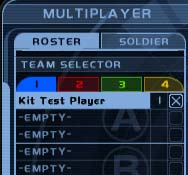
Once the server options are set, you can proceed to the Player Setup screen, and click the Roster tab. Under the Team Selector, click on the blue team #1 tab, click on one of the EMPTY slots and check off the box to the right of your name. This assigns you to Team #1, which should contain the new kit.
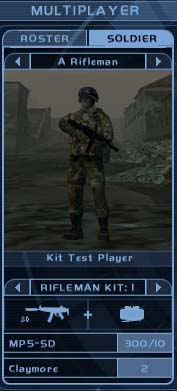
Switch to the Soldier tab, and click the arrows at the top until it says “A Rifleman”. You now have the MP5-SD rifle and Claymore as your default kit!
Be sure to save the file any time you make any changes, and restart Ghost Recon after each change.
Good Luck!